Deploying the Modernized 3-Tier Application on Kubernetes
In the previous parts of this series we:
- Containerized a traditional VM-based 3-tier application
- Built Docker images for each component
- Prepared the application for container execution
In this final part we deploy the application on Kubernetes, recreating the original architecture using Kubernetes primitives. The key goal is to demonstrate how a traditional architecture can move to Kubernetes without rewriting the application itself.
Application Architecture
The application contains four main components.
Tier | Technology | Purpose |
Web Tier | NGINX | Reverse proxy and external entry point |
Application Tier | Flask | User interface |
API Tier | FastAPI | CRUD API layer |
Database | MongoDB | Persistent data store |
The deployed Kubernetes architecture looks like this:
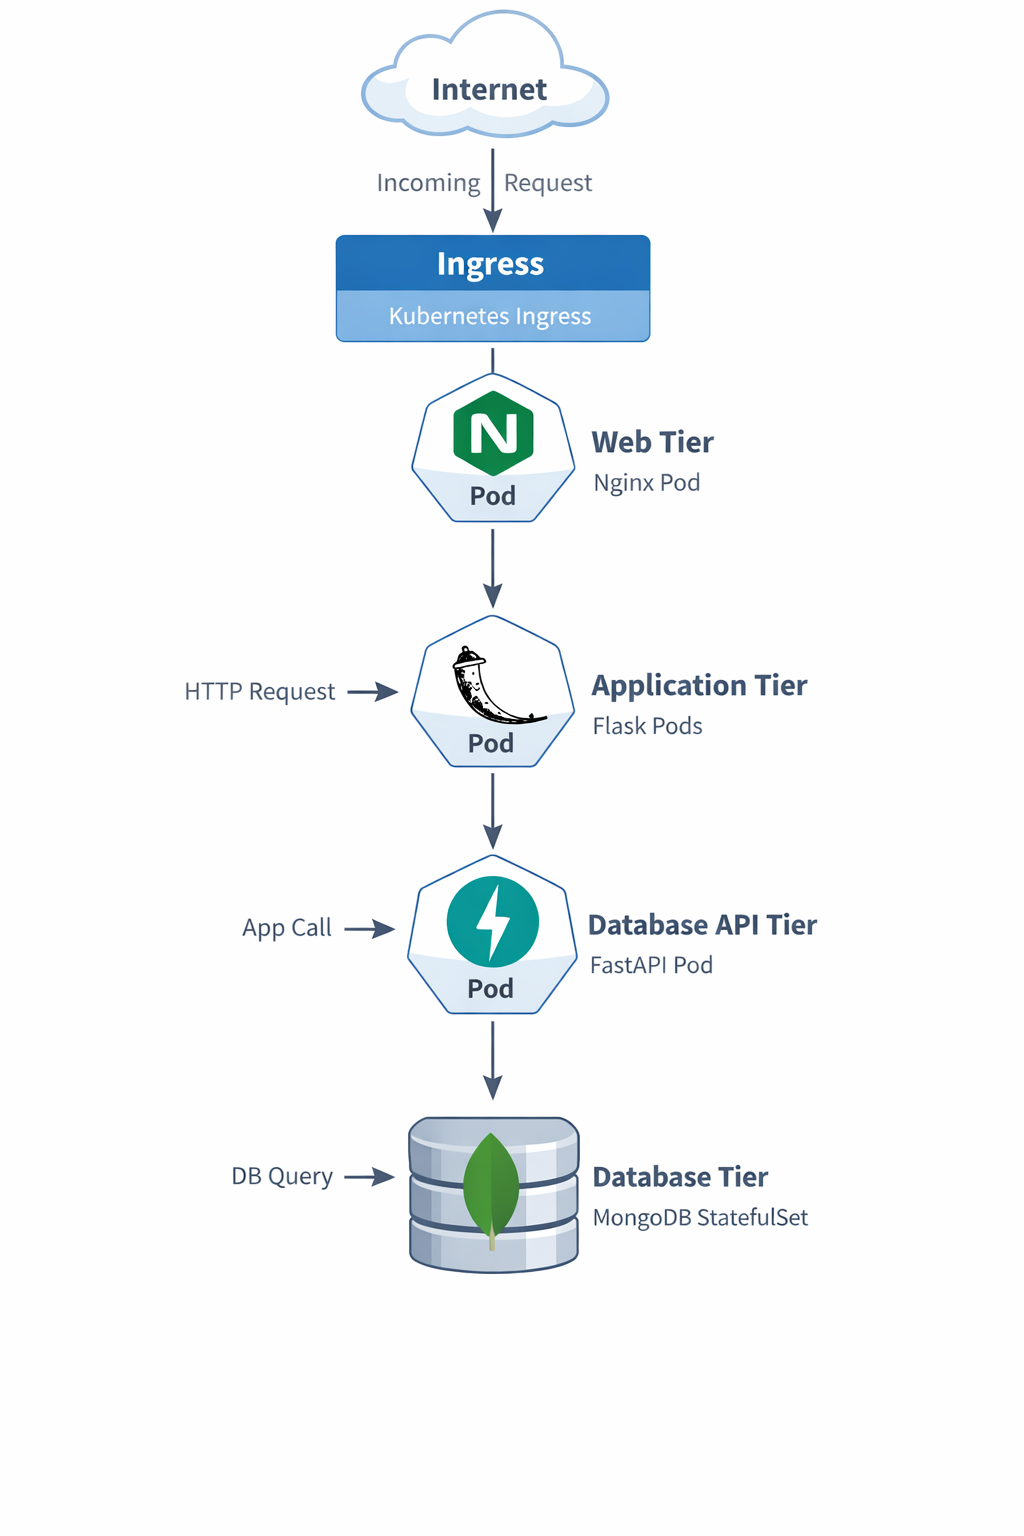
Each tier is deployed using the Kubernetes resource that best matches its behavior.
Component | Kubernetes Resource |
MongoDB | StatefulSet |
API Service | Deployment |
Application Service | Deployment |
Web Tier | Deployment |
Web Configuration | ConfigMap |
Database Initialization | Job |
External Access | Ingress |
Steps to Deploy the Application
Provided below are the steps which I followed to deploy the application in Kubernetes. Note, I had a desktop environment for testing the application. So, few areas are aimed towards a desktop environment only. If you are deploying the application in a larger environment, you may skip those areas.
Step 1 — Create a Namespace
All resources are deployed into a dedicated namespace.
File: namespace.yaml
apiVersion: v1
kind: Namespace
metadata:
  name: demo-3tier-app
What it does
Creates the namespace demo-3tier-app
Why it matters
- Keeps your app resources isolated
- Makes cleanup easier
- Avoids clutter in the default namespace
Deploy
kubectl apply -f namespace.yaml
This keeps the entire application logically grouped under a single namespace.
Step 2 — Deploy MongoDB
MongoDB is a stateful service, so it is deployed using a StatefulSet. This file contains both:
- the MongoDB internal Service
- the MongoDB StatefulSet
StatefulSets provide:
- persistent storage
- stable pod identity
- predictable networking
File: mongo-statefulset.yaml
apiVersion: v1
kind: Service
metadata:
  name: mongo
  namespace: demo-3tier-app
spec:
  selector:
    app: mongo
  ports:
  - port: 27017
    targetPort: 27017
---
apiVersion: apps/v1
kind: StatefulSet
metadata:
  name: mongo
  namespace: demo-3tier-app
spec:
  serviceName: mongo
  replicas: 1
  selector:
    matchLabels:
      app: mongo
  template:
    metadata:
      labels:
        app: mongo
    spec:
      containers:
      - name: mongo
        image: mongo:6
        ports:
        - containerPort: 27017
        volumeMounts:
        - name: mongo-storage
          mountPath: /data/db
  volumeClaimTemplates:
  - metadata:
      name: mongo-storage
    spec:
      accessModes:
      - ReadWriteOnce
      resources:
        requests:
          storage: 1Gi
What it does
- Creates an internal Service named mongo
- Deploys MongoDB as a StatefulSet
- Attaches persistent storage
Why it matters
MongoDB is stateful. If you deploy it as a simple stateless Deployment, you risk losing data. StatefulSet gives:
- stable pod identity
- stable storage
- data persistence across restarts
How it fits the app
db-api connects to Mongo using:
mongodb://mongo:27017
Deploy
kubectl apply -f mongo-statefulset.yaml
Verify MongoDB is running
kubectl get pods -n demo-3tier-appkubectl get svc -n demo-3tier-app
Step 3 — Initialize the Database
This portion covers the Database preparation and configuration.
Pre-requisite
The below section is the pre-requisite. I have already run and created the image. So you won't have to run this part.
The Custom mongo-init Image
The initialization job uses a custom image called:
demo-mongo-init
This image contains:
- MongoDB client tools
- the employee dataset
- an initialization script
Directory Structure
mongo-init/
 ├── Dockerfile
 ├── init-mongo.sh
 └── MOCK_DATA.json
Initialization Script
The script performs the database setup.
File: init-mongo.sh
#!/bin/sh
set -e

echo "Waiting for MongoDB..."

until mongosh --host mongo --eval "db.adminCommand('ping')" >/dev/null 2>&1
do
  sleep 2
done

echo "MongoDB ready"

mongoimport \
 --host mongo \
 --db employees_DB \
 --collection employees \
 --file /seed/MOCK_DATA.json \
 --jsonArray \
 --drop

mongosh mongodb://mongo:27017/employees_DB \
 --eval 'db.employees.createIndex({emp_id:1},{unique:true})'

mongosh mongodb://mongo:27017/employees_DB \
 --eval 'db.employees.createIndex({first_name:1,last_name:1},{unique:true})'

echo "Database initialized"
Dockerfile
FROM mongo:6
WORKDIR /seed
COPY MOCK_DATA.json /seed/MOCK_DATA.json
COPY init-mongo.sh /init-mongo.sh
RUN chmod +x /init-mongo.sh
ENTRYPOINT ["/init-mongo.sh"]
Build the image:
docker build -t <dockerhub-user>/demo-mongo-init:latest ./mongo-init
docker push <dockerhub-user>/demo-mongo-init:latest
Deploying the Database
When MongoDB starts it contains no data. To populate the employee dataset we use a Kubernetes Job.
File: mongo-init-job.yaml
apiVersion: batch/v1
kind: Job
metadata:
  name: mongo-init
  namespace: demo-3tier-app
spec:
  backoffLimit: 3
  template:
    spec:
      restartPolicy: OnFailure
      containers:
      - name: mongo-init
        image: <dockerhub-user>/demo-mongo-init:latest
        imagePullPolicy: Always
What it does
Runs a one-time Kubernetes Job that:
- Waits for MongoDB to become available
- Imports employee data from MOCK_DATA.json
- Creates database indexes
Why it matters
The MongoDB instance is not usable just because the pod is running. It also needs:
- employee data loaded
- unique indexes created
This preserves the original behavior of the VM-based app.
Deploy
kubectl apply -f mongo-init-job.yaml
Verify
kubectl get jobs -n demo-3tier-appkubectl logs job/mongo-init -n demo-3tier-app
You should see messages indicating that:
- employee records were imported
- database indexes were created
Confirm data in MongoDB
kubectl exec -it mongo-0 -n demo-3tier-app -- mongosh
Then inside mongosh:
use employees_DB
db.employees.countDocuments()
db.employees.getIndexes()
Step 4 — Deploy the FastAPI Database API
The API layer exposes CRUD operations.
File: db-api-deployment.yaml
apiVersion: apps/v1
kind: Deployment
metadata:
  name: db-api
  namespace: demo-3tier-app
spec:
  replicas: 1
  selector:
    matchLabels:
      app: db-api
  template:
    metadata:
      labels:
        app: db-api
    spec:
      containers:
      - name: db-api
        image: <dockerhub-user>/demo-db-api:latest
        ports:
        - containerPort: 8000
        env:
        - name: MONGO_DETAILS
          value: mongodb://mongo:27017
---
apiVersion: v1
kind: Service
metadata:
  name: db-api
  namespace: demo-3tier-app
spec:
  type: NodePort
  selector:
    app: db-api
  ports:
  - port: 8000
    targetPort: 8000
    nodePort: 30000
What it does
- Deploys the FastAPI backend
- Exposes it internally as db-api
- Also exposes it externally through NodePort
Why it matters
This tier:
- receives CRUD requests from the Flask app
- talks to MongoDB
- provides Swagger and ReDoc
Why NodePort
I wanted to preserve the original behavior where the DB tier was directly reachable. So NodePort gives you direct host-level access for testing.
Access it directly
First get Minikube IP:
http://<MINIKUBE-IP>:30080
Deploy
kubectl apply -f db-api-deployment.yaml
Step 5 — Deploy the Flask Application
The Flask application renders the user interface. This file contains both:
- the Flask Deployment
- the Flask Service
File: app-deployment.yaml
apiVersion: apps/v1
kind: Deployment
metadata:
  name: demo-app
  namespace: demo-3tier-app
spec:
  replicas: 1
  selector:
    matchLabels:
      app: demo-app
  template:
    metadata:
      labels:
        app: demo-app
    spec:
      containers:
      - name: demo-app
        image: <dockerhub-user>/demo-app:latest
        ports:
        - containerPort: 8080
        env:
        - name: DB_API_HOST
          value: db-api
        - name: DB_API_PORT
          value: "8000"
---
apiVersion: v1
kind: Service
metadata:
  name: demo-app
  namespace: demo-3tier-app
spec:
  type: NodePort
  selector:
    app: demo-app
  ports:
  - port: 8080
    targetPort: 8080
    nodePort: 30080
What it does
- Deploys the Flask application
- Exposes it internally as demo-app
- Also exposes it externally using NodePort
Why it matters
This is the main application logic and UI layer. It:
- renders the employee page
- calls the db-api backend
- serves the frontend experience
Access it directly
http://<MINIKUBE-IP>:30080
Deploy:
kubectl apply -f app-deployment.yaml
Step 6 — Deploy the Web Tier (NGINX)
The web tier acts as a reverse proxy. Instead of modifying NGINX dynamically like the original VM scripts, Kubernetes uses a ConfigMap. This file contains all three:
- the NGINX ConfigMap
- the NGINX Deployment
- the NGINX Service
File: web-deployment.yaml
apiVersion: v1
kind: ConfigMap
metadata:
  name: web-nginx-config
  namespace: demo-3tier-app
data:
  default.conf: |
    upstream app_backend {
        server demo-app:8080;
    }

    upstream db_api_backend {
        server db-api:8000;
    }

    server {
        listen 80;

        location / {
            proxy_pass http://app_backend;
        }

        location /docs {
            proxy_pass http://db_api_backend/docs;
        }

        location /redoc {
            proxy_pass http://db_api_backend/redoc;
        }

        location /openapi.json {
            proxy_pass http://db_api_backend/openapi.json;
        }
    }
---
apiVersion: apps/v1
kind: Deployment
metadata:
  name: demo-web
  namespace: demo-3tier-app
spec:
  replicas: 1
  selector:
    matchLabels:
      app: demo-web
  template:
    metadata:
      labels:
        app: demo-web
    spec:
      containers:
      - name: demo-web
        image: nginx:alpine
        ports:
        - containerPort: 80
        volumeMounts:
        - name: nginx-config
          mountPath: /etc/nginx/conf.d/default.conf
          subPath: default.conf
      volumes:
      - name: nginx-config
        configMap:
          name: web-nginx-config
---
apiVersion: v1
kind: Service
metadata:
  name: demo-web
  namespace: demo-3tier-app
spec:
  selector:
    app: demo-web
  ports:
  - port: 80
    targetPort: 80
What it does
- Creates the NGINX config using a ConfigMap
- Runs the NGINX container
- Exposes it internally as demo-web
Why it matters
This is the Kubernetes replacement for the old customize-web1-vm.start / customize-web2-vm.start logic. Instead of rewriting NGINX on a VM, Kubernetes now mounts the config into the NGINX pod.
Important benefits
- / goes to Flask
- /docs goes to FastAPI Swagger
- /redoc goes to FastAPI ReDoc
- /openapi.json goes to FastAPI OpenAPI spec
This keeps the user inside the main web entry point.
Deploy
kubectl apply -f web-deployment.yaml
Step 7 — Expose the Application with Ingress
Ingress provides external access to the application.
File: ingress.yaml
apiVersion: networking.k8s.io/v1
kind: Ingress
metadata:
  name: demo-3tier-ingress
  namespace: demo-3tier-app
spec:
  ingressClassName: nginx
  rules:
  - http:
      paths:
      - path: /
        pathType: Prefix
        backend:
          service:
            name: demo-web
            port:
              number: 80
What it does
- Exposes the demo-web service externally
- Sends all browser traffic into the NGINX web tier
Why it matters
This is your external entry point for the application.
Deploy
kubectl apply -f ingress.yaml
Running on Minikube
Start the tunnel:
minikube tunnel
Check ingress:
kubectl get ingress -n demo-3tier-app
Access the Application
Open the application:
http://<INGRESS-IP>Swagger UI:
http://<INGRESS-IP>/docsReDoc:
http://<INGRESS-IP>/redocValidation commands
kubectl get pods -n demo-3tier-appkubectl get svc -n demo-3tier-appkubectl get ingress -n demo-3tier-appkubectl get jobs -n demo-3tier-appkubectl logs job/mongo-init -n demo-3tier-app
Packaging the Application with Helm
Up to this point, we deployed the application using raw Kubernetes manifests.
While this works well, it introduces a challenge:
How do we distribute this application cleanly to others?
This is where Helm comes in.
Why Helm?
Helm is the package manager for Kubernetes.
Instead of applying multiple YAML files manually:
kubectl apply -f k8s/
We can install the entire application with a single command:
helm install demo-3tier ./helm/demo-3tier-app
What We Packaged
The Helm chart encapsulates the entire application:
- MongoDB (StatefulSet + PVC)
- MongoDB initialization (Job)
- Backend API (FastAPI)
- Application layer (Flask)
- Web layer (NGINX + ConfigMap)
- Ingress configuration
All of these are now:
- parameterized
- reusable
- versioned
Chart Structure
helm/demo-3tier-app/
├── Chart.yaml
├── values.yaml
├── values-minikube.yaml
├── templates/
│   ├── mongo-statefulset.yaml
│   ├── mongo-init-job.yaml
│   ├── db-api.yaml
│   ├── app.yaml
│   ├── web.yaml
│   ├── web-configmap.yaml
│   ├── ingress.yaml
│   └── NOTES.txt
Key Design Decisions
1. Separation of Concerns
Component | Responsibility |
|---|---|
StatefulSet | MongoDB runtime |
Job | Database initialization |
Deployment | Stateless services |
ConfigMap | NGINX configuration |
2. MongoDB Initialization Pattern
Instead of embedding initialization logic inside MongoDB:
We used:
Custom mongo-init image + Kubernetes Job
This keeps:
- database runtime clean
- initialization repeatable
- logic reusable
3. Configurable Deployment
All important parameters are controlled via:
values.yamlExample:
app:
  image:
    repository: demo-app
    tag: latest
This allows:
- environment-specific overrides
- easy upgrades
- flexible deployments
Installing the Application
helm install demo-3tier ./helm/demo-3tier-app \ -n demo-3tier-app \ --create-namespace
For Minikube:
helm install demo-3tier ./helm/demo-3tier-app \ -n demo-3tier-app \ --create-namespace \ -f values-minikube.yaml
What This Achieves
With Helm, the application is no longer just:
- source code
- or Kubernetes manifests
It becomes:
A fully packaged, installable platform
This is a major milestone in the modernization journey.
Where Helm Fits in the Evolution
VM → Docker → Kubernetes → Helm Package- Docker made the app portable
- Kubernetes made it scalable
- Helm makes it distributable
Final Result
We successfully migrated a traditional VM-based 3-tier application to Kubernetes using:
- StatefulSets
- Deployments
- Services
- ConfigMaps
- Jobs
- Ingress
Most importantly, we achieved this without modifying the application logic, demonstrating a practical pathway for modernizing existing applications.