Deploying the Modernized 3-Tier Application on Kubernetes
In the previous parts of this series we:
- Containerized a traditional VM-based 3-tier application
- Built Docker images for each component
- Prepared the application for container execution
In this final part we deploy the application on Kubernetes, recreating the original architecture using Kubernetes primitives. The key goal is to demonstrate how a traditional architecture can move to Kubernetes without rewriting the application itself.
Application Architecture
The application contains four main components.
Tier | Technology | Purpose |
|---|---|---|
Web Tier | NGINX | Reverse proxy and external entry point |
Application Tier | Flask | User interface |
API Tier | FastAPI | CRUD API layer |
Database | MongoDB | Persistent data store |
The deployed Kubernetes architecture looks like this:
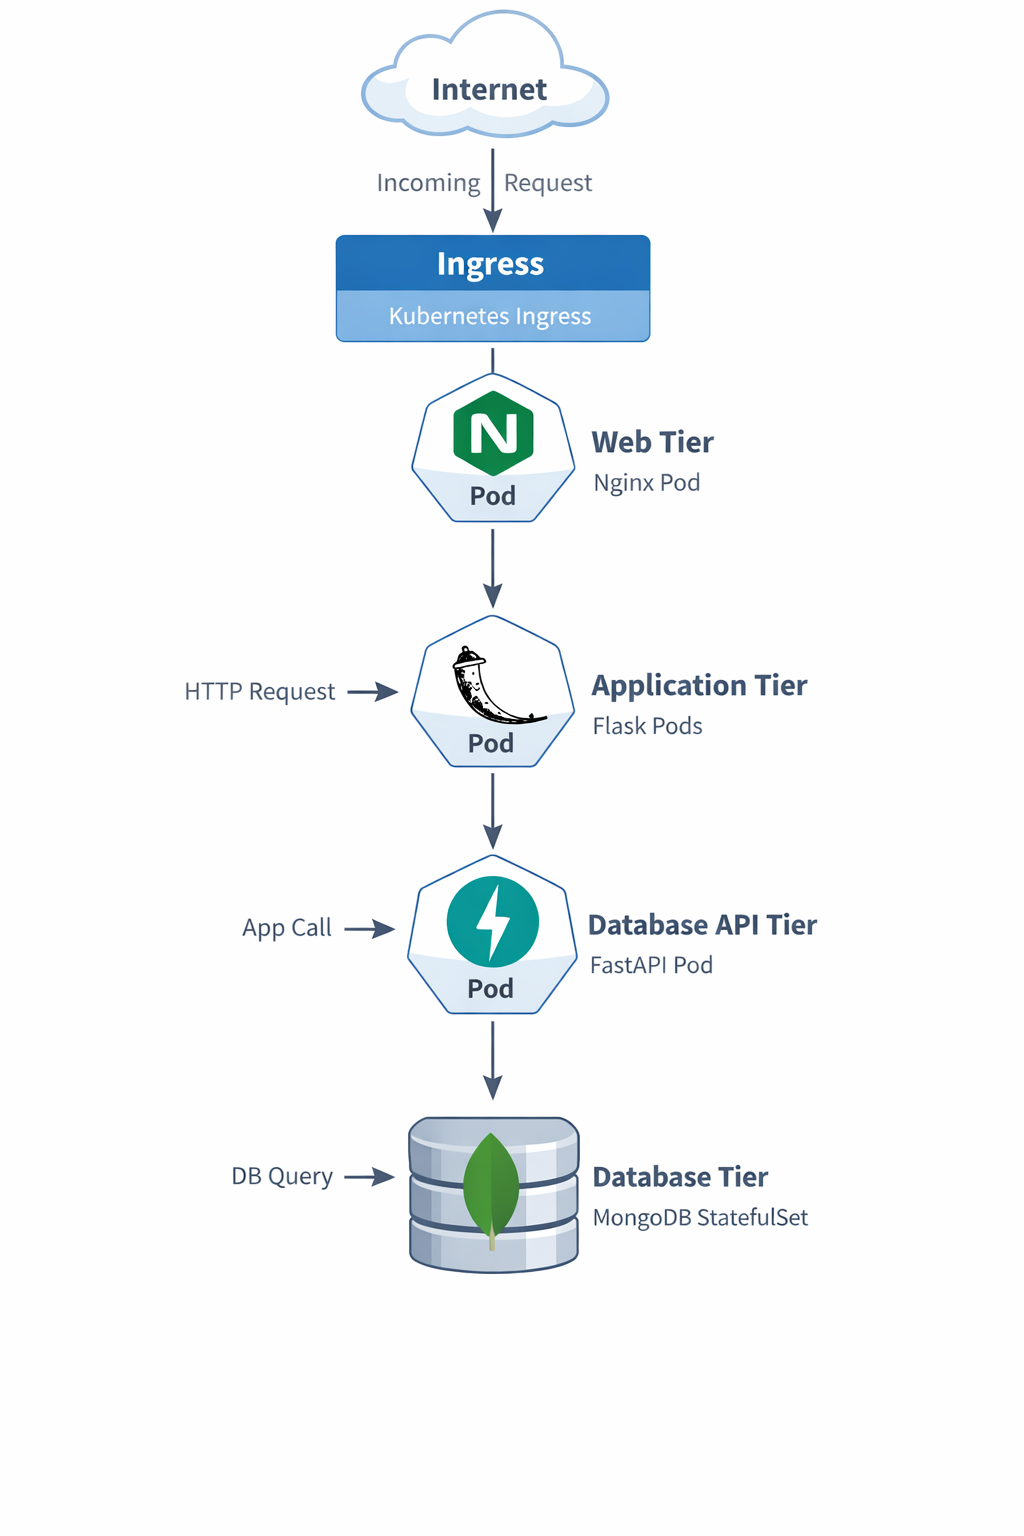
Each tier is deployed using the Kubernetes resource that best matches its behavior.
Component | Kubernetes Resource |
|---|---|
MongoDB | StatefulSet |
API Service | Deployment |
Application Service | Deployment |
Web Tier | Deployment |
Web Configuration | ConfigMap |
Database Initialization | Job |
External Access | Ingress |
Steps to Deploy the Application
Provided below are the steps which I followed to deploy the application in Kubernetes. Note, I had a desktop environment for testing the application. So, few areas are aimed towards a desktop environment only. If you are deploying the application in a larger environment, you may skip those areas.
Step 1 — Create a Namespace
All resources are deployed into a dedicated namespace.
File: namespace.yaml
apiVersion: v1
kind: Namespace
metadata:
  name: demo-3tier-app
What it does
Creates the namespace demo-3tier-app
Why it matters
- Keeps your app resources isolated
- Makes cleanup easier
- Avoids clutter in the default namespace
Deploy
kubectl apply -f namespace.yaml
This keeps the entire application logically grouped under a single namespace.
Step 2 — Deploy MongoDB
MongoDB is a stateful service, so it is deployed using a StatefulSet. This file contains both:
- the MongoDB internal Service
- the MongoDB StatefulSet
StatefulSets provide:
- persistent storage
- stable pod identity
- predictable networking
File: mongo-statefulset.yaml
apiVersion: v1
kind: Service
metadata:
  name: mongo
  namespace: demo-3tier-app
spec:
  selector:
    app: mongo
  ports:
  - port: 27017
    targetPort: 27017
---
apiVersion: apps/v1
kind: StatefulSet
metadata:
  name: mongo
  namespace: demo-3tier-app
spec:
  serviceName: mongo
  replicas: 1
  selector:
    matchLabels:
      app: mongo
  template:
    metadata:
      labels:
        app: mongo
    spec:
      containers:
      - name: mongo
        image: mongo:6
        ports:
        - containerPort: 27017
        volumeMounts:
        - name: mongo-storage
          mountPath: /data/db
  volumeClaimTemplates:
  - metadata:
      name: mongo-storage
    spec:
      accessModes:
      - ReadWriteOnce
      resources:
        requests:
          storage: 1Gi
What it does
- Creates an internal Service named mongo
- Deploys MongoDB as a StatefulSet
- Attaches persistent storage
Why it matters
MongoDB is stateful. If you deploy it as a simple stateless Deployment, you risk losing data. StatefulSet gives:
- stable pod identity
- stable storage
- data persistence across restarts
How it fits the app
db-api connects to Mongo using:
mongodb://mongo:27017
Deploy
kubectl apply -f mongo-statefulset.yaml
Verify MongoDB is running
kubectl get pods -n demo-3tier-appkubectl get svc -n demo-3tier-app
Step 3 — Initialize the Database
This portion covers the Database preparation and configuration.
Pre-requisite
The below section is the pre-requisite. I have already run and created the image. So you won't have to run this part.
The Custom mongo-init Image
The initialization job uses a custom image called:
demo-mongo-init
This image contains:
- MongoDB client tools
- the employee dataset
- an initialization script
Directory Structure
mongo-init/
 ├── Dockerfile
 ├── init-mongo.sh
 └── MOCK_DATA.json
Initialization Script
The script performs the database setup.
File: init-mongo.sh
#!/bin/sh
set -e

echo "Waiting for MongoDB..."

until mongosh --host mongo --eval "db.adminCommand('ping')" >/dev/null 2>&1
do
  sleep 2
done

echo "MongoDB ready"

mongoimport \
 --host mongo \
 --db employees_DB \
 --collection employees \
 --file /seed/MOCK_DATA.json \
 --jsonArray \
 --drop

mongosh mongodb://mongo:27017/employees_DB \
 --eval 'db.employees.createIndex({emp_id:1},{unique:true})'

mongosh mongodb://mongo:27017/employees_DB \
 --eval 'db.employees.createIndex({first_name:1,last_name:1},{unique:true})'

echo "Database initialized"
Dockerfile
FROM mongo:6
WORKDIR /seed
COPY MOCK_DATA.json /seed/MOCK_DATA.json
COPY init-mongo.sh /init-mongo.sh
RUN chmod +x /init-mongo.sh
ENTRYPOINT ["/init-mongo.sh"]
Build the image:
docker build -t <dockerhub-user>/demo-mongo-init:latest ./mongo-init
docker push <dockerhub-user>/demo-mongo-init:latest
Deploying the Database
When MongoDB starts it contains no data. To populate the employee dataset we use a Kubernetes Job.
File: mongo-init-job.yaml
apiVersion: batch/v1
kind: Job
metadata:
  name: mongo-init
  namespace: demo-3tier-app
spec:
  backoffLimit: 3
  template:
    spec:
      restartPolicy: OnFailure
      containers:
      - name: mongo-init
        image: <dockerhub-user>/demo-mongo-init:latest
        imagePullPolicy: Always
What it does
Runs a one-time Kubernetes Job that:
- Waits for MongoDB to become available
- Imports employee data from MOCK_DATA.json
- Creates database indexes
Why it matters
The MongoDB instance is not usable just because the pod is running. It also needs:
- employee data loaded
- unique indexes created
This preserves the original behavior of the VM-based app.
Deploy
kubectl apply -f mongo-init-job.yaml
Verify
kubectl get jobs -n demo-3tier-appkubectl logs job/mongo-init -n demo-3tier-app
You should see messages indicating that:
- employee records were imported
- database indexes were created
Confirm data in MongoDB
kubectl exec -it mongo-0 -n demo-3tier-app -- mongosh
Then inside mongosh:
use employees_DB
db.employees.countDocuments()
db.employees.getIndexes()
Step 4 — Deploy the FastAPI Database API
The API layer exposes CRUD operations.
File: db-api-deployment.yaml
apiVersion: apps/v1
kind: Deployment
metadata:
  name: db-api
  namespace: demo-3tier-app
spec:
  replicas: 1
  selector:
    matchLabels:
      app: db-api
  template:
    metadata:
      labels:
        app: db-api
    spec:
      containers:
      - name: db-api
        image: <dockerhub-user>/demo-db-api:latest
        ports:
        - containerPort: 8000
        env:
        - name: MONGO_DETAILS
          value: mongodb://mongo:27017
---
apiVersion: v1
kind: Service
metadata:
  name: db-api
  namespace: demo-3tier-app
spec:
  type: NodePort
  selector:
    app: db-api
  ports:
  - port: 8000
    targetPort: 8000
    nodePort: 30000
What it does
- Deploys the FastAPI backend
- Exposes it internally as db-api
- Also exposes it externally through NodePort
Why it matters
This tier:
- receives CRUD requests from the Flask app
- talks to MongoDB
- provides Swagger and ReDoc
Why NodePort
I wanted to preserve the original behavior where the DB tier was directly reachable. So NodePort gives you direct host-level access for testing.
Access it directly
First get Minikube IP:
http://<MINIKUBE-IP>:30080
Deploy
kubectl apply -f db-api-deployment.yaml
Step 5 — Deploy the Flask Application
The Flask application renders the user interface. This file contains both:
- the Flask Deployment
- the Flask Service
File: app-deployment.yaml
apiVersion: apps/v1
kind: Deployment
metadata:
  name: demo-app
  namespace: demo-3tier-app
spec:
  replicas: 1
  selector:
    matchLabels:
      app: demo-app
  template:
    metadata:
      labels:
        app: demo-app
    spec:
      containers:
      - name: demo-app
        image: <dockerhub-user>/demo-app:latest
        ports:
        - containerPort: 8080
        env:
        - name: DB_API_HOST
          value: db-api
        - name: DB_API_PORT
          value: "8000"
---
apiVersion: v1
kind: Service
metadata:
  name: demo-app
  namespace: demo-3tier-app
spec:
  type: NodePort
  selector:
    app: demo-app
  ports:
  - port: 8080
    targetPort: 8080
    nodePort: 30080
What it does
- Deploys the Flask application
- Exposes it internally as demo-app
- Also exposes it externally using NodePort
Why it matters
This is the main application logic and UI layer. It:
- renders the employee page
- calls the db-api backend
- serves the frontend experience
Access it directly
http://<MINIKUBE-IP>:30080
Deploy:
kubectl apply -f app-deployment.yaml
Step 6 — Deploy the Web Tier (NGINX)
The web tier acts as a reverse proxy. Instead of modifying NGINX dynamically like the original VM scripts, Kubernetes uses a ConfigMap. This file contains all three:
- the NGINX ConfigMap
- the NGINX Deployment
- the NGINX Service
File: web-deployment.yaml
apiVersion: v1
kind: ConfigMap
metadata:
  name: web-nginx-config
  namespace: demo-3tier-app
data:
  default.conf: |
    upstream app_backend {
        server demo-app:8080;
    }

    upstream db_api_backend {
        server db-api:8000;
    }

    server {
        listen 80;

        location / {
            proxy_pass http://app_backend;
        }

        location /docs {
            proxy_pass http://db_api_backend/docs;
        }

        location /redoc {
            proxy_pass http://db_api_backend/redoc;
        }

        location /openapi.json {
            proxy_pass http://db_api_backend/openapi.json;
        }
    }
---
apiVersion: apps/v1
kind: Deployment
metadata:
  name: demo-web
  namespace: demo-3tier-app
spec:
  replicas: 1
  selector:
    matchLabels:
      app: demo-web
  template:
    metadata:
      labels:
        app: demo-web
    spec:
      containers:
      - name: demo-web
        image: nginx:alpine
        ports:
        - containerPort: 80
        volumeMounts:
        - name: nginx-config
          mountPath: /etc/nginx/conf.d/default.conf
          subPath: default.conf
      volumes:
      - name: nginx-config
        configMap:
          name: web-nginx-config
---
apiVersion: v1
kind: Service
metadata:
  name: demo-web
  namespace: demo-3tier-app
spec:
  selector:
    app: demo-web
  ports:
  - port: 80
    targetPort: 80
What it does
- Creates the NGINX config using a ConfigMap
- Runs the NGINX container
- Exposes it internally as demo-web
Why it matters
This is the Kubernetes replacement for the old customize-web1-vm.start / customize-web2-vm.start logic. Instead of rewriting NGINX on a VM, Kubernetes now mounts the config into the NGINX pod.
Important benefits
- / goes to Flask
- /docs goes to FastAPI Swagger
- /redoc goes to FastAPI ReDoc
- /openapi.json goes to FastAPI OpenAPI spec
This keeps the user inside the main web entry point.
Deploy
kubectl apply -f web-deployment.yaml
Step 7 — Expose the Application with Ingress
Ingress provides external access to the application.
File: ingress.yaml
apiVersion: networking.k8s.io/v1
kind: Ingress
metadata:
  name: demo-3tier-ingress
  namespace: demo-3tier-app
spec:
  ingressClassName: nginx
  rules:
  - http:
      paths:
      - path: /
        pathType: Prefix
        backend:
          service:
            name: demo-web
            port:
              number: 80
What it does
- Exposes the demo-web service externally
- Sends all browser traffic into the NGINX web tier
Why it matters
This is your external entry point for the application.
Deploy
kubectl apply -f ingress.yaml
Running on Minikube
Start the tunnel:
minikube tunnel
Check ingress:
kubectl get ingress -n demo-3tier-app
Access the Application
Open the application:
http://<INGRESS-IP>Swagger UI:
http://<INGRESS-IP>/docsReDoc:
http://<INGRESS-IP>/redocValidation commands
kubectl get pods -n demo-3tier-appkubectl get svc -n demo-3tier-appkubectl get ingress -n demo-3tier-appkubectl get jobs -n demo-3tier-appkubectl logs job/mongo-init -n demo-3tier-app
Final Result
We successfully migrated a traditional VM-based 3-tier application to Kubernetes using:
- StatefulSets
- Deployments
- Services
- ConfigMaps
- Jobs
- Ingress
Most importantly, we achieved this without modifying the application logic, demonstrating a practical pathway for modernizing existing applications.
If you want, I can also give you one final section for the blog that will dramatically improve the article quality:
“Key Lessons Learned While Migrating a VM-Based Application to Kubernetes.”
It adds architectural insight that readers love.