This is the 3rd and final part of the series. In this part I will detail about how to use and deploy the application manually or using supplied OVA.
Changes in Architecture:
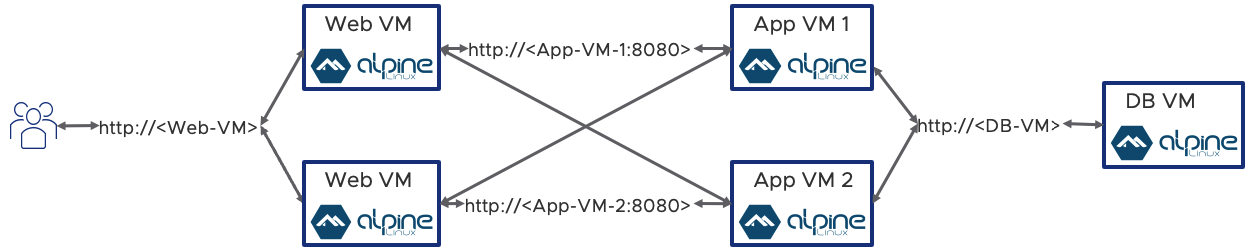
Please check the earlier posts for the details of other layers (Part 1 and Part 2) I have made few changes in the architecture. First, as mentioned earlier, I moved away from using Ubuntu as database server OS due to its size. Also, I have added another app vm and configured the frontend Nginx as a load balancer as well. The updated options and architecture are depicted in the following pictures.
Overall Architecture
Install from the Fling:
This is the easiest way to utilize the overall application. Currently this application has been released as a fling in VMware website. Check the fling at 3-Tier Demo Cloud Application - Fling .
The fling has the OVA with all the components (5 VMs with database included in it). Overall size of the OVA is less than 500 MB and once deployed, it will take around 1GB space.
The fling location also has the source files if you need it.
Other Options
Provided below other options to download and use the application.
Database VM with DB
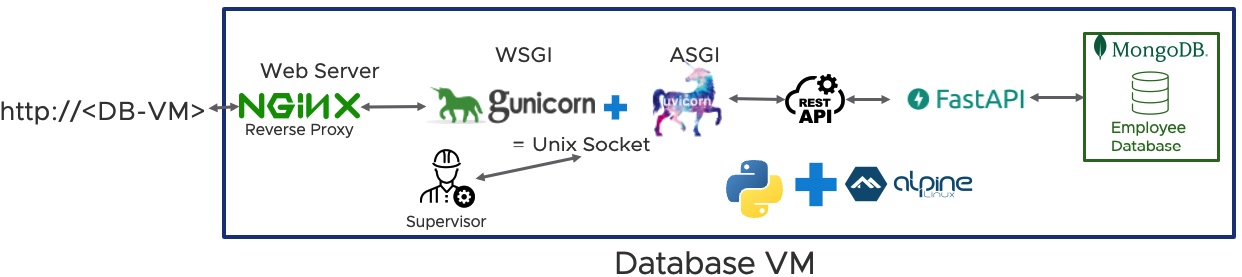
Size of the VM is around 1.1 GB.
Database VM without DB
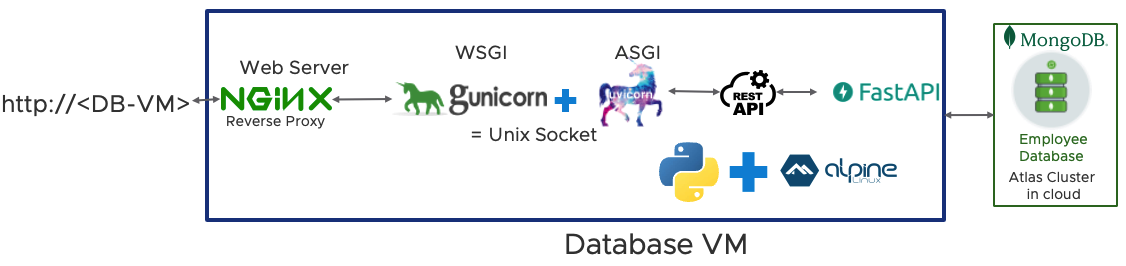
Size of the VM is around 100MB.
Method 1: Deploy using the OVA
There are two OVAs available. One with in-built database installed and configured and the other without the database. The one without the database relies on an external database.
Download the OVAs
- OVA with DB included (no external DB is required)
- OVA without the DB (requires external DB)
Deployment process
Follow the guides below to deploy the OVAs
OVA with the DB
This OVA requires special attention. Follow the steps given in the official documentation on how to deploy an ova. Once the ova is deployed. DO NOT power it on. If you try to power it on, it will fail saying there is no suitable host to power on the VM. This error comes from DB-01 VM. The guest OS in the VM is Rocky Linux which is a supported VM from vSphere 8.0. But the current compatibility of the VMs are from vSphere 7.0 which does not sense it. So, in order for it work, first change the Guest OS type of the DB-01 VM. For this, do the following:
Go to DB-01 VM --> Edit Settings --> VM Options --> General Options --> Set the following Values:
Guest OS Family: Linux
Guest OS Version: CentOS Linux (64 bit)
Once you have done that, simply power on the vApp. That should give you a fully working 3-tier Demo Cloud Application.
OVA without DB
This one is straight forward. Just deploy the OVA as per available guidance in official documentation.
Remember, for this setup to work you need an external MongoDB database. You can either install it locally or create an account in MongoDB Atlas cloud. In any case add the access method as a parameter while deploying the OVA. The parameter mostly would be in the following format (in case of Atlas cluster):
mongodb+srv://<user id>:<text>@<database>.<text>.mongodb.net/<options>In both cases the application can be accesses from http://<web-vm-ip-or-fqdn>
Method 2: Manual Installation
In this section I will describe how to install the application manually. First, download the codes from the GitHub repository.
The repository has two folders, one for App VM and the other for DB VM. As the name suggests, the codes are for the respective VMs. In the next section I will explain how to manually setup the environment.
Application with DB
In this section I will detail how to install the application along with the database in it.
Step 1: Deploy the VMs
First, deploy four (4) VMs. Install Alpine Linux 3.17.2 in three of them and install Rocky Linux 9 in another. They are for the following purposes.
- 1 DB VM (Rocky Linux 9)
- 2 App VMs (Alpine Linux 3.17.2)
- 1 Web VM (Alpine Linux 3.17.2)
These act as the base VMs.
Step 2: Configure DB VM
First change the hostname of the VM.
Transfer the files
Transfer all the files under DB VM repository to /root/emplayee-database folder. Namely the following files:
- MOCK_DATA.json
Next, we will install MongoDB locally in the DB VM.
cat > /etc/yum.repos.d/mongodb-org-6.0.repo << EOF

[mongodb-org-6.0]
name=MongoDB Repository
baseurl=https://repo.mongodb.org/yum/redhat/9/mongodb-org/6.0/x86_64/
gpgcheck=1
enabled=1
gpgkey=https://www.mongodb.org/static/pgp/server-6.0.asc

EOF


yum install -y mongodb-org
systemctl start mongod
systemctl status mongod
systemctl enable mongod- Next, disable firewall.
Not a security best practice. I am doing this as this is a demo env..
systemctl disable firewalld
systemctl stop firewalld.service
service firewalld stop
systemctl stop firewalld
Install Nginx
yum install -y nginx
systemctl enable nginx
systemctl start nginx
Disable SELinux
Not a security best practice. I am doing this as this is a demo env..
setenforce 0
echo "SELINUX=disabled" >> /etc/sysconfig/selinux
Configure the Database.
Import the Data.
cd /root/employee-databasemongoimport --db=employees_DB --collection=employees --file=./MOCK_DATA.json --jsonArrayCreate unique indexes
First, we will create an unique index on emp_id and then on first_name and last_name combination.
mongosh

use employees_DB
db.employees.createIndex( { "emp_id":1}, { unique: true} )
db.employees.createIndex( {  "first_name":1, "last_name":1}, { unique: true } )
Install pip and requirements
Create gunicorn systemd service
vi /etc/systemd/system/emp-db.service

[Unit]
Description=Gunicorn instance daemon to serve Employee Record Database API
After=network.target
Before=nginx

[Service]
Type=simple
#Restart=on-failure
#TimeoutStopSec=70
#StartLimitIntervalSec=300
#StartLimitBurst=50
User=root
Group=root
WorkingDirectory=/root/employee-database
ExecStart=/usr/local/bin/gunicorn -w 2 -b unix:emp-db.sock -m 007 -k uvicorn.workers.UvicornWorker app:app  --access-logfile /root/employee-database/logs/gunicorn-access.log --error-logfile /root/employee-database/logs/gunicorn-error.log

[Install]
WantedBy=multi-user.target
Enable the service
Change the user in /etc/nginx/nginx.conf from nginx to root. Restart the service.
Change the MONGO_DETAILS variable in employee_database.pyfile.
Comment out line 17 containing MONGO_DETAILS = "mongo-db-url"
to make it # MONGO_DETAILS = "mongo-db-url"
And uncomment line 15 # MONGO_DETAILS = "mongodb://localhost:27017"to make it MONGO_DETAILS = "mongodb://localhost:27017"
Step 3: Configure App VM
Follow the steps for both the app-01 and app-02 VMs. Both the VMs has identical configuration (except hostname and IP).
Transfer the files
Transfer all the files under App VM repository to /root/emplayee-app folder. Namely the following files:
Remember, the files and folders under "static" and "templates" folder needs to be maintained in exact order.
Install packages
#!/bin/sh
cd /root/employee-app
nohup /usr/bin/gunicorn --bind 0.0.0.0:8080 app:app --reload --access-logfile /root/employee-app/logs/gunicorn-access.log --error-logfile /root/employee-app/logs/gunicorn-error.log &
Change permission
Install Nginx
Change the user
Change the user nginx in /etc/nginx/nginx.conf file to root.
Change it near the top
user root;
Application without DB
To install and configure without DB there are two main differences.
Step 1: Deploy the VMs
First, deploy four (4) VMs. Install Alpine Linux 3.17.2 in all of them. They are for the following purposes.
- 1 DB VM
- 2 App VMs
- 1 Web VM
These act as the base VMs.
Step 2: Configure DB VM
Just complete the following steps (skipping the DB installation part)
- Create the folders
/root/employee-database/logs - Transfer the respective files
- Configure gunicorn service
- Change permission.
- Install packages (detailed above under DB VM section)
- Install Nginx
- Configure Nginx (detailed above)
Step 3: Configure App VM
Follow all the steps mentioned above.
Step 4: Configure Web VM
Follow all the steps mentioned above.
The steps should give you a working set of the application.
Troubleshooting
All the gunicorn related logs are in the following location.
- Database VM:
/root/employee-database/logs - App VM:
/root/employee-app/logs
Nginx related logs are in /var/logs/nginx/ .
- Nginx logs: