Purpose
I wrote a blog on Auto-Scaling and got many questions regarding that topic. Also, after the release of vRealize Automation 7.3.1 onwards, the workflows stopped working. So, this post has the answer to all those questions and the updated package which will work with vRealize Automation versions upwards from 7.3. Though this post mainly covers the answers to the questions, it contains information about the subject as a whole and can be further categorized into the following sub topics:
- Definition
- Why should we use it
- Points to consider
- Candidates
- Methods
- Lab example
- Final words
- Demo
Definition
Autoscaling, also spelled auto scaling or auto-scaling, and sometimes also called automatic scaling, is a method used in cloud computing, whereby the amount of computational resources in a server farm, typically measured in terms of the number of active servers, scales automatically based on the load on the farm. It is closely related to, and builds upon, the idea of load balancing. [Source: Wikipedia]
Auto-Scaling mainly introduced by Amazon in AWS Cloud services. So the terminologies and types are majorly influenced by AWS terminologies. Today this service is offered by all the other public cloud services (Azure, Google Cloud and others). Also, this service can be build easily in any private cloud environment or in any virtual environment.
In my opinion, Auto-Scaling is a feature and should not be tagged with any particular environment (cloud/virtualization or otherwise) . Same feature can be built easily in any private cloud/virtualized environment or even in purely physical environment as well (through monitoring and scripting).
Why
Autoscaling offers the following advantages:
- Scaling Out/In or Up/Down as needed, thus saving resources and energy (mostly in private datacenter environment)
- In Cloud environment, this will result in lesser bill, as, the money charged is directly proportional to used resources
- No need for upfront investment for future usage (e.g. Black Friday sale etc.) [specially in Cloud environment]
- Easily replace crashed or unhealthy nodes which in turn ensures uptime and performance as per requirement.
Points to consider
Most of the times, I hear people say they want to implement “Auto-Scaling” without understanding the requirements.
There are two aspects of implementing Auto-Scaling. They are:
- Implementing at Infrastructure layer
- Implementing at Application layer
For the entire feature to be successful, both of the above aspects needs to go hand in hand.
Implementing Auto-Scaling in infra level is easy. But to be truly effective, the application for which it is designed needs to be aware of the environment. The requirements are provided below.
Requirements
- Application must be auto-scale aware
- Point one translates to application being clustered in nature (in case of scale out/in). Nodes should be added and removed without hampering application operation
- Infrastructure should be easily scalable (agile in nature)
- Proper triggering mechanism (monitoring and alerting)
Provided below are the considerations required for the successful operation of the feature.
Considerations
- Initial waiting period – when to start scaling
- Gap between scaling
- Stateless vs stateful applications
- Stateless applications (e.g. web servers with nothing stored locally)
- Stateful applications (e.g. nodes processing payments)
- When to stop (upper limit)
- When to scale down
- Till which point to scale down
- Triggers for scaling – few examples, CPU/Memory usage, Network traffic (number of hits), number of transactions etc.
General observation, time for scaling up should be less than time taken for scaling down. Example, if for scaling out is triggered for 10 minutes of network load, then scaling in should be done after 30 minutes to 1 hour of less activity. Otherwise, too much scaling will happen resulting in unwanted situations.
Possible Candidates
Provided below is a list of possible candidates. Remember, this is not an absolute list.
- Stateless webservers (web server farm)
- Stateful front end servers (while scaling down, special precautions need to be taken)
- Mid-tier application servers or other applications which has cluster functionality and supports addition/removal of nodes at runtime
- Database servers - scale-up, scale out in case of multiple nodes is supported or required.
Consideration: In most cases, webserver or application servers are the targeted use cases. Database servers or applications of similar kind are the least targeted or preferred candidates for this service.
Finally, implementation is limited only by your imagination.
Methods
There are two well accepted methods among others. These are listed below:
- Pre-Deployment
- Runtime Deployment
Here, we will discuss only about the above two methods.
Pre-Deployment Method
In this method, all the required nodes are pre-deployed and are kept in standby mode (powered off or suspended). Under correct situations they are either powered on or brought into the cluster. Generally the following steps are performed.
- Deploy the pre-decided maximum number of nodes and either keep them in powered off mode or standby mode
- Nodes can be pre-configured to be part of the cluster (cluster nodes) or can be added at runtime
- Power On/Off the nodes as and when required as per the triggering condition
Provided below is a list of advantages and disadvantages of this method.
Advantages
- Less reaction time
- Does not require resource intensive operations (storage IO or runtime deployment)
Dis-advantages
- Does not give maximum saving (storage is still consumed)
Runtime Deployment Method
In this method, the nodes are deployed at runtime as and when required. Generally, the following steps are performed for this method.
- Nodes are deployed or removed at runtime
- As the nodes are deployed, they become part of the cluster or removed from from it (node addition/removal)
Advantages
- Maximum resource saving
- Maximum monetary saving
Disadvantages
- Large reaction time (lot of runtime time hogging operations, such as node deployment, addition to or removal from cluster etc.)
- Resource intensive operations. If large load comes then multiple nodes are deployed in quick succession, leading to excessive IO operations. Can lead to unwanted situations.
Based on the requirement choose carefully between these two methods. I believe this is a balance between performance and saving. If the application is time sensitive, then choose the pre-deployment method. Otherwise if monetary or resource saving is the main consideration, then choose the second method.
Lab Example
As demonstrated in my earlier post, here I will provide an example from my lab. For this, I used the following VMware products.
- vRealize Automation (version 7.5)
- vRealize Operations Manager (version 7.0)
- vRealize Orchestrator (version 7.5)
- vCenter server (version 6.5 U1)
- Webhook Shims
Provided below is a picture which shows logical lab setup.
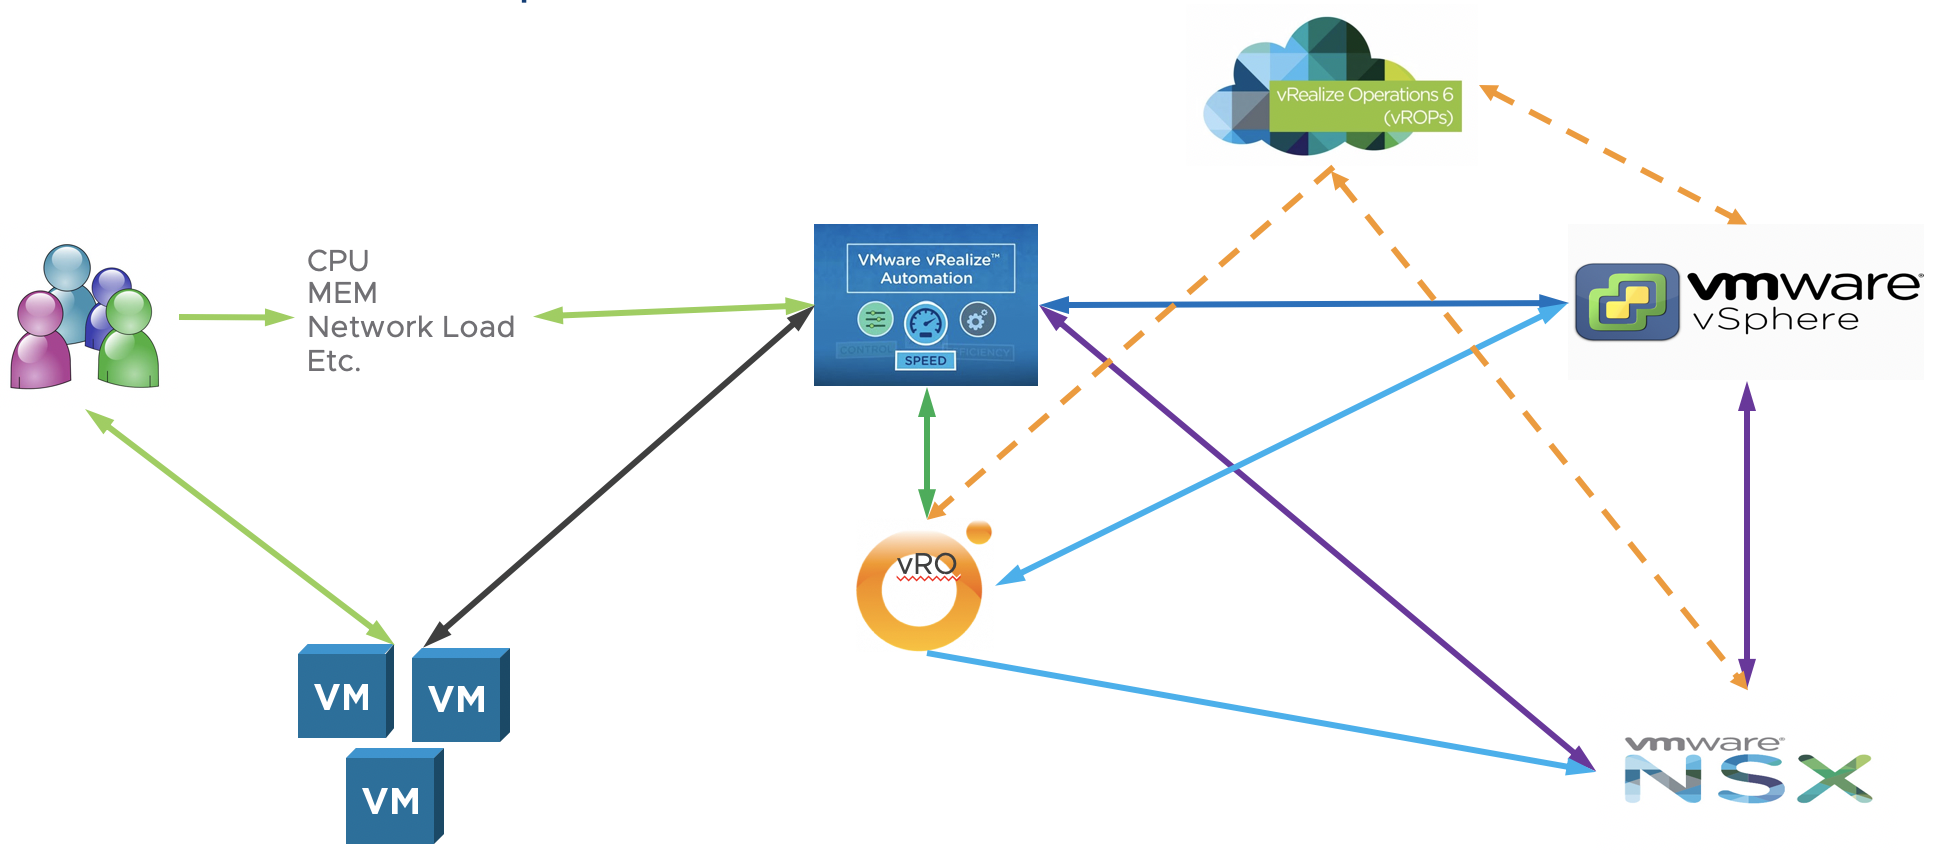
How it works
In my lab, the VM’s are deployed through vRealize Automation (vRA). vCenter server is used as endpoint. Total environment is monitored by vRealize Operations Manager (vROps). vROps is also used for alert notifications. The alerts are sent to vRealize Orchestrator (vRO) which in turn runs a workflow. Through this workflow we initiate appropriate action (Scale Out or In) in vRA.
Note: For this demonstration we are utilizing Out of the Box feature of vRA. vRA provides action items Scale Out and In per deployment. So, this makes our task easier.
Another point to note, vROps can send notifications to vRO using three methods, SNMP trap, REST notifications and using vRO plugin. Merit and de-merit for all are provided below:
SNMP Traps
Merits
- Does not require extra resources configuration
- Simpler to setup
De-merits
- Irrespective of the nature, all the traps are sent over to vRO
- vRO needs to constantly listen for the right trap. This puts extra pressure on vRO
- Not a very clean way of handling the traps
REST Notification
Merits
- Much cleaner way of handling the alerts
- Alert specific workflow can be initiated from vRO
- vRO does not need to listen for alerts/traps. The workflow runs only when an alert is triggered.
De-Merits
- Needs extra resource and configuration
- Right now, the dependent technologies are not tested for scale in production
vRO Plugin
Merits
- No extra overhead at vRO
- Fully supported from VMware
- Easier processing of alerts than SNMP traps
- Workflows are fired as per alert, so no extra overhead at vRO
De-Merits
- Lenghtier setup than SNMP traps
- For some, the configuration may seem complex
For my lab, I have chosen to demonstrate REST Notification and vRO Plugin. If you need details on how to setup and use SNMP traps, then check my earlier post.
One point to note, REST notification sends data in JSON format. The format in which vROps sends data is not understood by vRO. vRO expects data in another format. So, to solve this, we need Webhook Shims in between. Webhook Shims works as translator for vRO. This is the extra configuration needed for REST notification. In my opinion, result is worth the extra effort. Provided below is a picture on how Webhook Shims work in the entire scenario.
Also, for this demonstration I am selecting only CPU as the triggering mechanism. For a more detailed demonstration with load balancers (NSX) and HTTP hits as triggering mechanism, please check my earlier post.
Special mention
I am impressed with vRO plugin method of alert triggering. Perhaps the most useful till now. For future references I am going to depend more and more on this method.
Please check up the video for a detailed description on how to configure and set this up. I have spent some time in detailing this process.
For background read please check the blogs from John Dias
For detailed information, check the documentation .
Videos
For more details, check the following video.
I tried to record the video 4 times and somehow all four times it crashed my system. This is reason I am so late in publishing the blog. Finally, I have divided the recording in two parts. The first part has the theoretical aspect explained. The second part has the demo in my lab. So, depending on what you are looking for, you can watch the videos accordingly.
Auto Scale - Part 1 - Details
Auto Scale - Part 2 - Demo
Acknowledgement
I am thankful to VMware for the softwares in the lab and the presentation template used in the presentation. The quality of the ppt template is unparalleled and I like the simplicity. I am also thankful to Ron Tsai for sharing the updated workflows.
Conclusion
This is a very useful feature. Specially in the virtualization and cloud computing age. Though the examples I gave are using VMware technologies, you can build this solution using any other tools. Please check the solution and let me know your feedbacks. As always, thanks for your time and patience.